

I love making shaped cards with my Pazzles Studio Pro Software so, I thought I would have a go at making an easel card using a simple svg shape from
Lettering Delights with my cutting machine.

I have used a selection of files from the
Easter Egg Bundle which includes the egg shape, bow, fence and quilled flowers. The shapes all come in (ai, dxf, eps, gsd, jpg, pdf and svg) file formats.

Firstly, I imported my egg shaped svg into my Pazzles Studio Pro software onto my mat. I cut it out using my recently purchased First Edition 12 x 12 paper pack called Spring Drop.

I then duplicated the egg shape and moved it to the side to make my base card.

I selected MIRROR - DUPLICATE - APPLY (selecting my top middle button for positioning).

I then MOVED the top shaped egg so it overlapped the bottom egg slightly.

Select ALL and then selected WELD.

Then, I made a perforation line at the join (for the fold) between the 2 egg shapes.
I also made a perforation line half way down the top shaped egg.
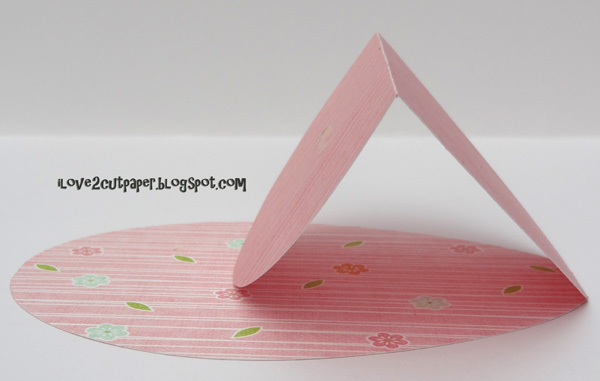
Once cut out I folded along the perforation lines as in the photo above.
Now it is beginning to look like an easel shape!

Here are all the elements on my mat before selecting CUT!

Here are all the pieces cut out before being assembled to the base easel card.

The top of the fence provides the support for the easel card to stand up.
The eggs on the fence were stickers from my paper pack.

I cut 2 of the bows using my Pazzles Inspiration cutting machine and made myself a band to go behind the bows. Then I used some of my favourite Quilled Flowers also available in the Easter Egg Bundle.

The beauty of an easel card is that it easily folds enabling it to fit into your envelope!
Have fun and enjoy making easel cards!

Click here to get your Easter Egg Bundle for $6.00!
See what's new at Lettering Delights!
To create a FREE ACCOUNT with Lettering Delights and get $40 of freebies please click on my "YOU'LL GO APE" Banner at the very TOP of my blog.
Many thanks xx
Well done!
ReplyDeleteA lovely card and very clear tutorial. Thank you. Dee xx
ReplyDeleteThis is so adorable sweetie...fab instructions too tfs! ;) Hugs x
ReplyDeleteWowww !!! Your projects are always so beautiful.
ReplyDeleteyour card is gorgeous!
ReplyDeleteWhich fantastic creation. Thank you for participating in our challenge. Marion
ReplyDeleteHoly cow this is so awesome! I love the paper, the design just everything about it. I just bought the LD set so I can make one, although I don't have that very cute paper.
ReplyDeleteThanks for all the sweet comments they mean so much to me and inspire me to keep sharing my projects in blog world! The paper is by First Edition 12 x 12 paper pack called Spring Drop (see link in post).
Delete