FREE LD product

FREE LD product
FREE Giraffing Out Aloud Product worth $40+ when you open a LD account

Thursday, 31 October 2013

Candy Corn Shaped Cards


I made these super quick Candy Corn shaped cards using my Pazzles Inspiration.  Honestly, they are so easy to make.  I used cutting files from the Pazzles Craft Room which included the Candy Corn and the cute Pen Tool faces.

Electronic Die Cutter 468x60

I used Kraft card for my base card together with scraps of papers from my stash.  I embossed the white cardstock using my Swiss Dots embossing folder.

I used the cute Pen Tool Faces with my NEW improved pen tool which has an easy-twist centre screw that tightens around the pens and markers of all shapes and sizes. For this project I used a black thin black Pental pen.  


These cutting files are accessible to download when you are a Pazzles Craft Room member which includes wpc and svg cutting files and a ton of other files and benefits.


Pazzles Pen Tool in motion.......hence blur on photo above, whoops!


I hand coloured in the eyes and cut the mouth using black cardstock.


I wanted to sprinkle a few Candy Corn treats around my shaped card, but here in the UK they don't sell them........how sad is that! 

available in WPC & SVG file formats
Candy Corn Pen Tool faces

Thousands of Images 468x60

Joanna xx


Tuesday, 29 October 2013

Halloween Tea Light Holders


I thought I better post this today otherwise Halloween will soon be over.  I made this weeks ago using my Pazzles Inspiration cutting machine and then completely forgot to post it!  So here goes.


I bought these wooden Tea Light Holders recently and thought I would have a go at decorating them.  I discarded the NOEL wooden letters and have saved them for a future project.

I painted the the wooden boxes using black paint. As I am just starting out at painting wooden items, I do not want to spend a ton of money on specialised paints so, I bought some tester pots of paints from my DIY store, in order that I can experiment.  I like to cover a kitchen plate with foil for my paint palette and then I can just unravel the foil and toss it in the bin when I am finished.  I used a cheap sponge from my local store which I cut up into a manageable size.


I also like to wear disposable gloves for my painting project to reduce the mess!  Basically, dab or wipe the black paint using the sponge all over the wooden Tea Light Holders.


Whilst the wooden items are drying I started to measure my holder.  Using my Pazzles software I drew a box the exact size of the holder.  I then selected in-line which gave me a smaller square for my paper cuts.


Using my Pazzles Inspiration cutting machine enabled me to very quickly cut out 12 squares of patterned paper ready for me to decorate the Tea Light Holders.


I used my double sided tape to adhere the paper to my box, but for a longer lasting hold you may want to use glue.


I distressed the edges of each of the patterned squares.


Then, I cut out the vinyl lettering and pumpkin shape and adhered them onto my boxes.


I weeded the shapes and used my tool to remove the vinyl.


In the above photo I have laid a piece of contact paper over the vinyl and used my Pazzles tool to ensure a good adhesion.


I simply used the contact paper to transfer the vinyl cut outs onto each of the wooden Tea Light Holders.


After, I had taken the photo I decided to sand down the edges of the the black boxes to give more definition, so you will have to use your imagination!


I then placed the battery Tea Lights into the wooden holders.

Supplies for this project
Wooden Tea Light Holders - The Mulberry Bush
Black Vinyl
Patterned Papers
Battery Tea Lights
Pumpkin Cutting File - Pazzles Craft Room (svg & wpc file format)
Electronic Die Cuttiing Machine - Pazzles Inspiration


Thousands of Images 468x60 

Electronic Die Cutter 468x60

Monday, 21 October 2013

Batty for you


Here is a card I have made "Batty for you" with my
Pazzles Inspiration electronic cutting machine.

Discover Creative Freedom  200x200

I have used a banner with some digital papers.  Basically, I selected the digital papers and printed them using my printer menu.  Everyone's printer is different, but because I only wanted a small amount of the papers, I printed out 2 different papers on one sheet.  I then cut them out and placed them on my cutting mat.


I know I have the option to save the papers on my computer and then import them, but I find this far easier and quicker to do.

I cut some purple cardstock and used a scalloped paper punch for the border between the 2 joins of patterned papers.  I took my banner and made it into a simple shaped card using my software.


I then made my sentiment using black cardstock.  I typed the word "Batty" in my software and welded the letters together.  I then found a stamp in my crafting cupboard and stamped "for you" using black ink.  These days I hardly ever buy stamped sentiments, as it is so easy to make my own using my cutting machine.


I Print & Cut this cute bat which comes in ai, dxf, eps, gsd, jpg, pdf and svg file formats and adhered it to the front of my card using craft foam pads.

Supplies used :-
Pazzles Inspiration - cutting machine
LD Knit Wits Socktober Cut It Set - Banner
Font - Batty
Halloween/Fall - latest released sets

Lettering Delights

Please leave a comment if you have learnt something from my blog post, I would love to have your feedback, hugs xx

I have entered this project into the Die Cuttin Divas - Halloween Challenge.


Sunday, 20 October 2013

Trick or Treat - Halloween Dress Up


I am just loving all the Halloween graphics and cutting files that LD are releasing at the moment.  There are so many lovely sets in the LD Monster Sale.

I made a shaped card of the Dress Up Skeleton in the set with my 
Pazzles Inspiration electronic cutter.  I cut out all the elements, but Print & Cut the face with the cute detail, for speed.

Electronic Die Cutter 468x60


I made my own eyes for the Pumpkin Bag and used a couple of elements from another set for the nose and mouth.


For the pumpkin I cut some black vinyl using the lettering from one of the 
Jack-O-Patterns Sets.

All the elements I have used come in  ai, dxf, eps, gsd, jpg, pdf and svg cuttable file formats.

Supplies used for this project
Jack-o-Patterns 3 - Cut It Simple Shapes (for mouth/nose on bag and pumpkin vinyl)

*****

Remember to check out all the Halloween and Fall files 
just released in the LD Monster Sale.

Save $3 when you shop! Purchase must be $10 or more. Use coupon code: PickledPeppers


Wednesday, 16 October 2013

3D Pumpkin


I thought I would share with you this cute little 3D Pumpkin available in the Pazzles Craft Room where it is  featured as a project called Thanksgiving Cornucopia Centerpiece.  The project includes a variety of dimensional fruits and vegetables in .WPC & .SVG formats which includes .pdf instructions to help you with the assembly of the items.


I cut the project using my Pazzles Inspiration electronic cutting machine with some heavier weight, double sided cardstock, followed the assembly instructions and added my pretties to the top.  I couldn't resist adding a real piece of branch for the stalk!

Electronic Die Cutter 468x60


I decided to use the Pazzles NEW improved Pen Tool for my sentiment.  I used a single line font from the Pazzles Font CD together with one of my Metallic chunky pens.  I have had these pens by Pentel for a few years, which are quite thick around the body but now fit in my new Pen Tool.  I am very excited by this, as I can now raid the kids assortment of pens and give them a go.  Once the sentiment was written, I simply cut my banner....ta da! Kind of pleased with myself with my little sentiment. 


 If you would like to make this 3D Pumpkin and the other 3D fruit and vegetables in the set you will have access to the project and many more when you join the Pazzles Craft Room.

Click here for the Pazzles Craft Room or image below for further details.

Thousands of Images 468x60


Follow on Bloglovin


Monday, 14 October 2013

Pumpkin Pillow Box


I thought I would share a quick Pumpkin Pillow Box with you, filled with some black liquorish flavoured jelly beans for Halloween.  The completed project is 4" x 2" which I cut using my Pazzles Inspiration cutting machine.

Electronic Die Cutter 468x60

This cutting file is available in .WPC and .SVG file format from the Pazzles Library and is accessible to Pazzles Craft Room members.  Membership allows you to download up to 40 cut files from the Library every 70 hours for a total of approximately 400 files per month. 

The Pumpkin Pillow Box is one of the NEW files that I downloaded this week from the Pazzles Library.


I cut my Pumpkin Pillow Box and adhered some printer transparency behind the pumpkin face.  I then poured in my jelly beans.  I glued the long piece of the stem to the back of the Pillow Box.  I decided not to use the foliage included in the file, but instead added a ribbon, punched flower and rhinestone.

This is a super quick project which would be great a party gifts for Halloween. 

Click here or image below to find out more 
information about the Pazzles Craft Room .

Thousands of Images 468x60


Follow on Bloglovin


Thursday, 10 October 2013

Ghost Treat Bag

Ghost gift bag, halloween, ilove2cutpaper, LD, Lettering Delights, Pazzles, Pazzles Inspiration, Pazzles Inspiration Vue, Inspiration Vue, Print and Cut, svg, cutting files, templates,

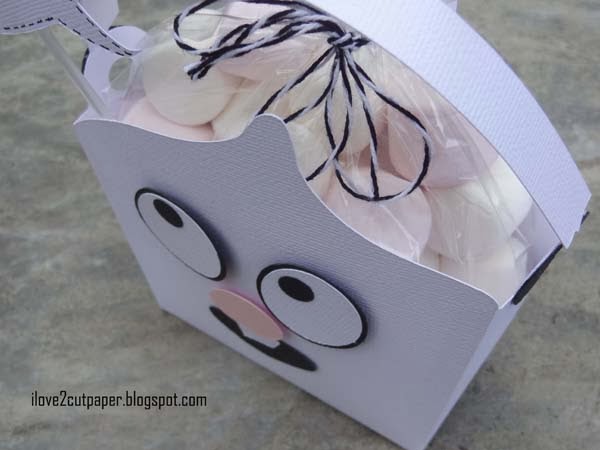
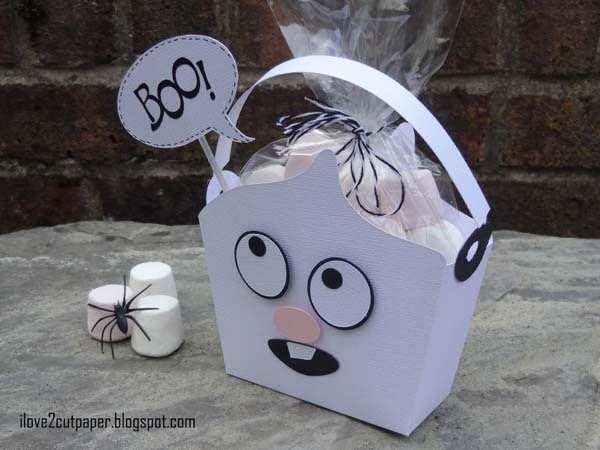
I am loving the LD Halloween Town - Cut It Bundle which includes a set of  Treat Bags (Cut Project Set - CP) as well as some other gorgeous Cut It's (svg included).  How cute is this Ghost Treat Bag?

Ghost gift bag, halloween, ilove2cutpaper, LD, Lettering Delights, Pazzles, Pazzles Inspiration, Pazzles Inspiration Vue, Inspiration Vue, Print and Cut, svg, cutting files, templates,

So simple to make using white, black and a scrap of pink cardstock.

Ghost gift bag, halloween, ilove2cutpaper, LD, Lettering Delights, Pazzles, Pazzles Inspiration, Pazzles Inspiration Vue, Inspiration Vue, Print and Cut, svg, cutting files, templates,

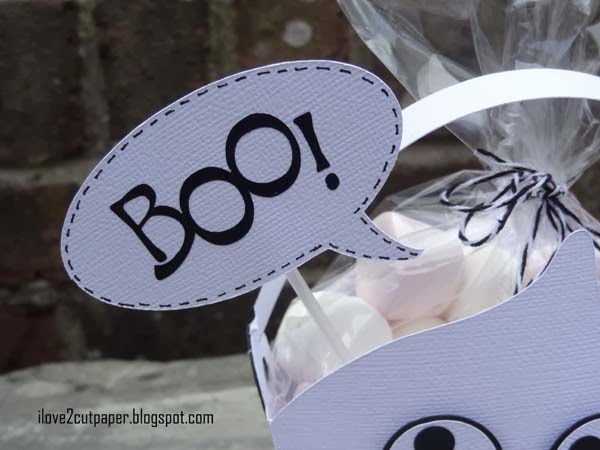
I used the speech bubble included in the LD Halloween Town - Cut It Bundle.  My cutter could not cut the exclamation mark in the sentiment, as it is so tiny.  Not to be beaten, I grabbed my black vinyl.  Once, I had weeded it out, I used my trusty contact paper and transferred it to my speech bubble....ta da!

Ghost gift bag, halloween, ilove2cutpaper, LD, Lettering Delights, Pazzles, Pazzles Inspiration, Pazzles Inspiration Vue, Inspiration Vue, Print and Cut, svg, cutting files, templates,

I filled the cello bag with marshmallows and tied it up with some twine.

Ghost gift bag, halloween, ilove2cutpaper, LD, Lettering Delights, Pazzles, Pazzles Inspiration, Pazzles Inspiration Vue, Inspiration Vue, Print and Cut, svg, cutting files, templates,

Please take a peep at the  LD Halloween Town - Cut It Bundle which includes some adorable Treat Bags in the Cut Project set (CP).  

Cutting Supplies:-
Pazzles Cutting Machine – Inspiration Vue
LD Ghost Treat Bag - Cut Project (CP)
LD Halloween Town Cut It Bundle - collection of Halloween products

*****
Click image below to see further details on the NEW Inspiration Vue cutting machine 
(available in 4 gorgeous colors).

Inspiration- Vue Print and Cut


Follow on Bloglovin